Description
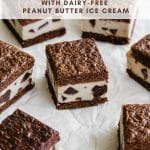
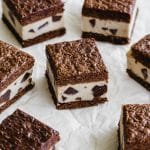
Peanut Butter Brownie Ice Cream Sandwiches are made with dairy-free peanut butter banana ice cream that’s nestled between chewy layers of peanut butter brownie. These homemade ice cream sandwiches are the perfect treat to have stashed in your freezer all year long!
Ingredients
For the brownie layers:
- 1/2 cup dairy-free dark chocolate chips
- 1/4 cup extra virgin olive oil
- 2 tablespoons natural smooth peanut butter
- 1/2 cup cane sugar
- 1/4 cup coconut sugar
- 2 large eggs
- 1 teaspoon vanilla extract
- 2/3 cup whole wheat flour
- 1/4 teaspoon baking powder
- 1/4 teaspoon kosher salt
For the ice cream filling:
- 4 cups sliced banana, frozen (about 6 small bananas)
- 1/3 cup natural smooth peanut butter
- 2 tablespoons maple syrup
- Optional add in: homemade chocolate peanut butter chunks (see notes) or 1/2 cup dairy-free dark chocolate chips
Instructions
Prepare the brownie layers:
- Pre-heat oven to 350F. Spray two 8-inch square pans with non-stick cooking spray and line with parchment paper (or use pans with removable bottoms).
- In a large microwave-safe bowl, add the chocolate chips, oil and peanut butter. Microwave on two 20-second intervals, stirring after each one until smooth and runny.
- Add in the sugars and whisk until combined.
- Whisk in the eggs, one at a time, and then whisk in the vanilla.
- In a small bowl, stir together the flour, baking powder and salt.
- Gradually add the dry ingredients to the wet mixture and stir until well incorporated.
- Pour into the prepared pans. The batter will be thick so use a spoon to spread it out into a thin layer.
- Bake for 9-11 minutes, or until a toothpick inserted in the middle comes out clean. Do not over bake. The brownies will firm up as they cool. Let them cool completely before adding the ice cream.
Prepare the ice cream filling:
- Add the frozen banana slices, peanut butter and maple syrup to a food processor bowl, and process on high until creamy. You’ll need to stop and scrape down the sides a few times.
- Stir in the chocolate peanut butter chunks or chocolate chips. (Skip this step is you’re not adding them to the ice cream).
Assemble the ice cream sandwiches:
- Place one of the brownie layers in the bottom of an 8-inch square pan lined with overhanging parchment paper (or with a removable bottom). Spread the ice cream evenly over this layer. Top with the other brownie layer and press down gently so it sticks to the ice cream. Place in the freezer for 5-6 hours, or until the ice cream is firm.
- Remove from freezer and let sit at room temperature for a few minutes. Use the parchment paper to lift the sandwiches out of the pan and cut into 16 squares. Place the sandwiches in an airtight container and store in the freezer.
Notes
- To make the chocolate peanut butter chunks, line a small bowl or dish (roughly 4-inches in diameter) with parchment paper. Add 1/2 cup of dairy-free dark chocolate chips and 1/4 cup of natural peanut butter to a microwave safe bowl, and microwave for two 30-second intervals, stirring well after each interval. Pour into the prepared dish and place in the freezer for an hour to set. Once set, chop into chunks.
- If you don’t have two 8-inch square pans, just bake your brownie layers one at a time. You can also try using two 9-inch round cake pans. Keep in mind that whatever pan you use, it should be high enough for the assembled sandwiches.
- You’ll need a large capacity and powerful food processor or blender to make the banana ice cream filling. If you have a smaller capacity and/or less powerful food processor or blender, you can make the ice cream filling in two batches. Just keep the first batch in the freezer while you make the second.
- Be sure to check out the FAQ as well as the tips and substitutions section above the recipe for more detailed advice and suggestions for making this recipe.