Description
Dairy-free, vegan and refined sugar-free, this Oat Milk Chia Pudding is a healthy, make ahead breakfast with just 3 ingredients and 3 minutes prep time!
Ingredients
- 2 cups unsweetened oat milk
- 7 tablespoons chia seeds
- 2 tablespoons maple syrup
Instructions
- Add the oat milk, chia seeds and maple syrup to a large bowl and whisk until the chia seeds are incorporated. (You can also add everything to a large mason jar, cover with the lid and shake well).
- Cover the bowl and place in the fridge for an hour.
- Remove and whisk together again. (This will get any chia seeds that sunk to the bottom of the bowl or clumped together).
- Place in the fridge for another 3 hours, or overnight. (The mixture should look thickened and set).
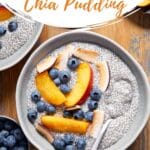
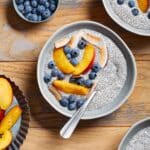
- Portion into bowls and serve with fruit and granola.
Notes
- If you don’t like the texture of chia seeds, try grinding them up before mixing them with the milk or you can blend the chia seeds with the milk.
- For a thicker pudding, add another tablespoon of chia seeds. For a thinner pudding, use fewer chia seeds or add more milk.
- To make sure the chia seeds are evenly mixed into the pudding, make sure the ingredients are fully whisked together.
- Feel free to add more sweetener. You can also add some vanilla extract for additional flavour, or whisk in some ground cinnamon.
- If you use sweetened oat milk, you may want to reduce the amount of maple syrup you add to the recipe.
- Be sure to check out the other sections above the recipe card for more detailed advice and suggestions for making this recipe.