
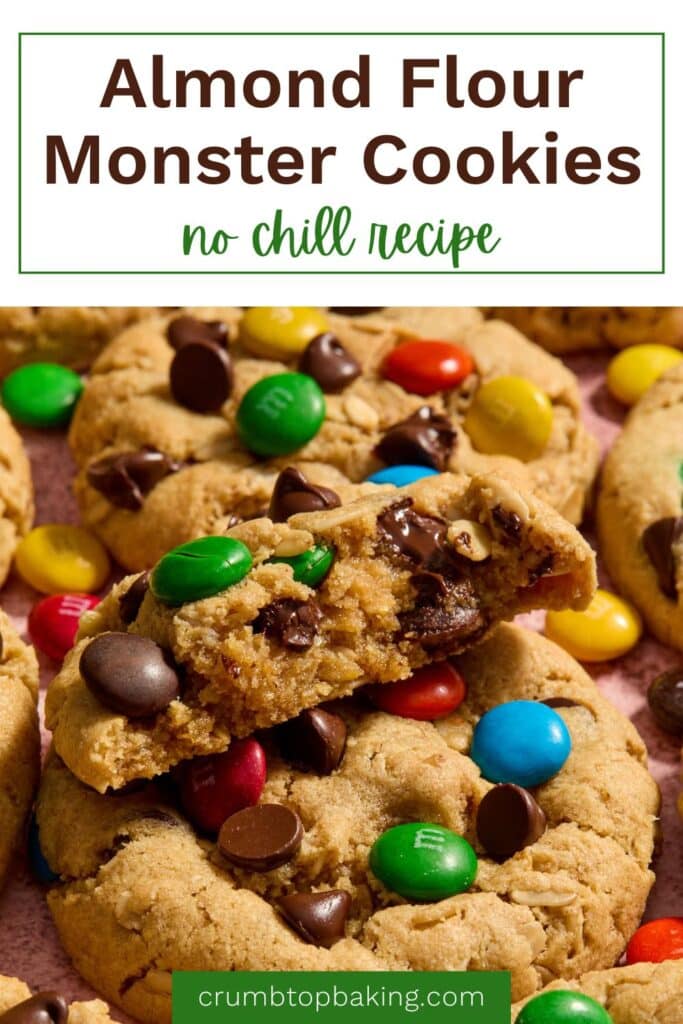
These Almond Flour Monster Cookies are thick, monster-sized cookies made with peanut butter and oats and packed with chocolate chips and M&Ms. They have chewy edges with a soft middle and these oversized cookies require zero chilling time and take only 10 minutes to bake!

Want to save this recipe for later?
Table of Contents
Monster cookies are usually extra large and thick, and have four key ingredients: peanut butter, oats, chocolate chips and M&Ms.
This almond flour version combines all of my favorite cookies in one - a peanut butter cookie, a chocolate chip cookie and an oatmeal cookie. You get all the flavor and texture of these different cookies in one delicious, extra large cookie that's also loaded with crunchy M&Ms.
If you love peanut butter cookies, you'll also love these almond flour peanut butter blossoms. While the dough requires an hour of chilling time, it's worth the wait for these soft baked cookies topped with a milk chocolate kiss!
What makes these monster cookies so good?
- They're larger than your average cookie!
- The chewy oats and crunchy M&Ms add the best texture.
- Using almond flour keeps these cookies extra moist and chewy.
- You don't need to chill the cookie dough. Just mix, scoop and bake!
Ingredients and substitutions
Below is a brief overview of some of the ingredients and recommended substitutions. The recipe card at the end of this post includes the full list of ingredients and quantities used.

- Peanut butter - For the best texture, use a smooth, shelf-stable peanut butter. If you use natural peanut butter (the runny kind that you need to mix and store in the fridge), your cookies will spread way too much.
- Almond flour - I always use fine, blanched almond flour in my cookies and cakes instead of almond meal. Blanched almond flour is made with raw almonds with the skins removed, as opposed to almond meal where the skins are left on. This creates a coarser flour texture.
- Oats - I've only tested this recipe with old fashioned rolled oats. You may be able to substitute with quick oats, but as they're more finely cut, they will absorb more moisture and may make the cookies a bit crumbly.
- Chocolate chips - I used dark chocolate chips as they're always my fave for cookies, but you can also use semi-sweet or milk chocolate chips.
- M&Ms - While I went with the brand name candies, you can use almost any kind of candy covered chocolates. You can also use mini M&Ms or seasonal M&Ms to change up these cookies for the holidays.
- Sugars - You'll need a mix of dark brown sugar and granulated sugar. You can also use light brown sugar and cane sugar if you prefer.
- Butter - To control the amount of salt in baked goods, I always use unsalted butter. Be sure to bring it to room temperature before beating it together with the peanut butter and sugars. This will ensure a light and creamy texture.
How to make monster cookies with almond flour
Below is a brief overview of the steps to make this recipe along with photos. For further details, please see the recipe card at the end of this post.


Measuring ingredients
For convenience, US cup measurements are included in the recipe card for this recipe. To ensure greater accuracy, however, weight and volume measurements are also provided. So, if you see grams (g), you'll want to use a kitchen scale to weigh your ingredients, and if you see milliliters (ml), you'll want to use a liquid measuring cup. Smaller quantities of ingredients are provided in teaspoons and tablespoons.
Storage and freezing tips
Storage: Keep the cookies in an airtight container on the counter. They will last for 4-5 days.
Freezing: Place the cooled cookies in a freezer safe container or resealable bag and store in the freezer for up to 3 months.
Key recipe tips
- For greater accuracy, I recommend weighing your ingredients. If you don't have a kitchen scale, be sure to use the spoon and level method when measuring.
- Make sure the peanut butter, butter and sugars are beaten together until creamy, fluffy and light. This will take a few minutes.
- Flatten the cookie dough balls a little before baking. This will help them spread.
- Don't over bake the cookies as they will turn out dry and crumbly. It's better to underbake them.
- Space out the cookie dough balls on the baking sheet. These cookies are large, so they'll need some room to spread. (I usually bake 5 per pan).
- I always recommend using a light colored baking sheet as darker sheets tend to brown cookies too much on the bottom.

Recipe FAQs
Yes, since we're using almond flour, these monster cookies are gluten-free. Just make sure that your oats and candy covered chocolates are also certified gluten-free.
Even though these are bigger cookies, they don't take that long to bake. It's also better to underbake them to ensure they stay soft and chewy, so start checking on them around 9 minutes. The cookies are ready when they look slightly golden on top but still look a little underbaked in the middle.
Yes, just roll the dough into balls, flatten slightly and press the additional chocolate chips and M&Ms into the tops. Store covered in a single layer in the fridge for up to two days or in the freezer for up to a month. To bake, let them thaw slightly at room temperature (to help them spread) and then bake as instructed. You may need to add another few minutes to the baking time.
If you chilled the dough or didn't press the dough balls down before baking, your cookies will not spread as much.

More almond flour cookie recipes
- Almond Flour Oatmeal Butterscotch Cookies
- Almond Flour Snickerdoodles
- Almond Flour Sugar Cookies
- Almond Flour Chocolate Chip Cookie Cake
If you make this recipe, I'd love to hear what you think in the comments below!
HUNGRY FOR MORE? Sign up for our newsletter and follow Crumb Top Baking on Instagram, Pinterest and Facebook!
If you make this recipe, please leave a review and rating below to let me know what you think. If you have a question, drop that below too!
📖 Recipe

Thick and Chewy Almond Flour Monster Cookies (No Chill!)
Ingredients
- 1 ¾ cups (182 g) fine blanched almond flour
- ½ teaspoon baking soda
- ¼ teaspoon fine sea salt
- ½ cup (145 g) smooth peanut butter, shelf stable
- ¼ cup (56 g) unsalted butter, room temperature
- ½ cup (115 g) dark brown sugar, packed
- ¼ cup (55 g) granulated sugar
- 1 large egg, room temperature
- 1 teaspoon vanilla extract
- ¾ cup (85 g) old fashioned rolled oats
- ½ cup (95 g) dark chocolate chips
- ½ cup (100 g) M&Ms
Instructions
- Preheat oven to 350F and line a large baking sheet with parchment paper.
- In a medium-sized bowl, whisk together the almond flour, baking soda and salt.
- In a large mixing bowl, use a stand or handheld electric mixer to cream together the peanut butter, butter, brown sugar and granulated sugar. This will take about 2-3 minutes. The mixture should look creamy with a lighter color.
- Add the egg and vanilla and beat until combined.
- On low speed, gradually add in the dry mixture until just combined.
- Use a spatula to stir in the oats and about two-thirds of the chocolate chips and M&Ms.
- Use a 3 tablespoon cookie scoop to measure out portions of the cookie dough and roll into balls. Place on the prepared pan about 3 inches apart. (I usually bake 5 per pan).
- Use the bottom of a measuring cup to flatten the tops of the dough balls slightly and press the remaining chocolate chips and M&Ms into the tops.
- Bake for 9-11 minutes, or until the cookies look slightly golden and almost set. (They will still look a little glossy in the middle).
- Let the cookies rest on the pan for 10 minutes before transferring to a wire rack to cool completely.
- Repeat with remaining dough.
Notes
- For greater accuracy, I recommend weighing your ingredients. If you don't have a kitchen scale, be sure to use the spoon and level method when measuring.
- Make sure the peanut butter, butter and sugars are beaten together until creamy and light. This will take a few minutes.
- Flatten the cookie dough balls a little before baking. This will help them spread.
- Don't over bake the cookies as they will turn out dry and crumbly. They should look a little underbaked when you pull them out of the oven.
- I always recommend using a light colored baking sheet as darker sheets tend to brown cookies too much on the bottom.
Want to save this recipe for later?
Nutrition Facts per Serving
Disclaimer
Nutrition information is an estimate only and will vary depending on the substitutions made and the brands used.
Did you make this recipe or have any questions?
I love reading your comments and addressing your questions, so please leave your comments and ratings or questions below!


Leave a Reply